

Organize Deep Kitchen Cabinets: 7 Access Solutions
Table of Contents
- Why Deep Kitchen Cabinets Are Hard to Organize (And How to Fix It)
- Step 1: Assess Your Current Layout and Dead Space
- Step 2: Install Pull-Out Shelves for Deep Cabinets
- Step 3: Use Lazy Susans and Turntables for Corner Access
- Step 4: Implement Deep Pantry Organization Ideas
- Step 5: Choose Kitchen Cabinet Storage Solutions That Fit Your Space
- Step 6: Optimize for Accessibility and Mobility
- Step 7: Make It Permanent or Rental-Friendly
Organize Deep Kitchen Cabinets: 7 Access Solutions
Last Updated: July 30, 2026
Learning how to organize deep kitchen cabinets for easy access is one of the most practical investments you can make in your home. Most kitchens waste significant space because items buried in the back become invisible and unusable. At ShopVerse.life, we've watched countless households struggle with this exact problem: deep cabinets that look spacious but feel impossible to navigate. The good news is that organizing them doesn't require renovation, it requires strategy.
This guide covers seven proven methods to reclaim that wasted depth and make everything accessible. You'll learn which solutions work best for different cabinet types, how to implement them without permanent damage, and which organizational systems actually stick long-term.
Why Deep Kitchen Cabinets Are Hard to Organize (And How to Fix It)
Deep cabinets create a fundamental problem: reach versus visibility. Items stored more than 12 inches back become harder to see and grab, especially for people with limited mobility or shorter reach. Most people respond by stacking things randomly, creating unstable piles that collapse when you pull out one item.
The real issue isn't the depth itself, it's that standard shelving doesn't account for it. A fixed shelf at eye level leaves dead space underneath and makes the back area completely inaccessible without removing everything in front.
The fix involves three core principles: visibility, accessibility, and vertical efficiency. Pull-out shelves, turntables, and vertical dividers all address these problems in different ways. The right combination depends on your cabinet dimensions, what you store, and how often you use each item.
Step 1: Assess Your Current Layout and Dead Space
Before buying anything, measure your cabinet and identify where items actually live versus where they get lost.
Remove everything from each deep cabinet and measure the depth from front to back, width, and height. Note any permanent fixtures, pipes, or outlets. Take a photo with lighting for reference while shopping.
Identify dead space, the area you can't comfortably reach without leaning in or removing other items. For most people, anything beyond 12-15 inches becomes problematic. Everything stored there should either be rarely-used items or items you'll access through a pull-out mechanism.
Check what you actually store: baking supplies, pantry items, small appliances, or pots and pans all require different approaches. Frequently-used items should live in the front-to-back accessible zone. Seasonal items can go deeper if you have a system to retrieve them.
Finally, assess your cabinet type. Are shelves fixed or adjustable? Do you have corner cabinets or standard rectangular ones? This determines which solutions will work.
Step 2: Install Pull-Out Shelves for Deep Cabinets
Pull-out shelves transform deep cabinets by bringing items to you instead of requiring you to reach into darkness.
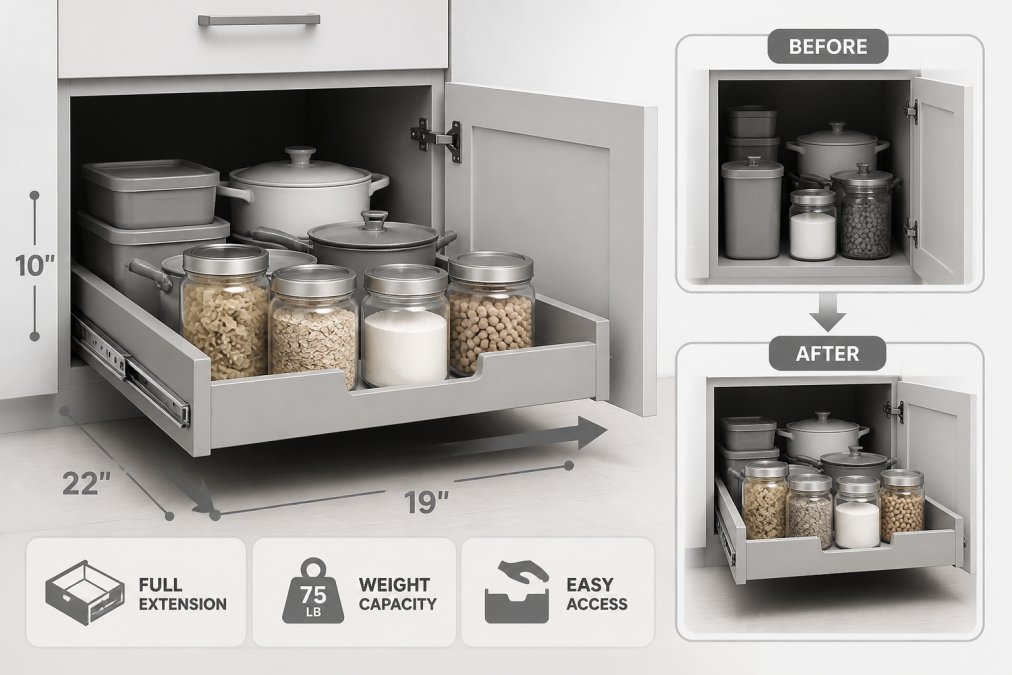
Pull-out shelves come in two types: retrofit systems that fit inside existing cabinets, and full-replacement shelves. For renters or anyone avoiding permanent changes, retrofit pull-outs are the better choice.
A retrofit pull-out shelf uses ball-bearing slides mounted to the inside of your cabinet walls. The shelf glides out smoothly, bringing everything within arm's reach. Installation typically takes 20-30 minutes per shelf and requires only a drill and screwdriver. Most retrofit systems are fully removable.
Measure your cabinet interior width and depth carefully. Pull-out shelves come in standard widths (12, 15, 18, and 21 inches) and depths (12-20 inches). The shelf should be slightly narrower than your cabinet interior so it slides freely.
When installing, ensure the slides are level. Even a slight tilt causes the shelf to drift or stick. Use a level tool and adjust mounting brackets until perfect. Test the glide multiple times before loading items.
Check the weight capacity, most retrofit shelves handle 50-75 pounds. Distribute weight evenly across the shelf to avoid stressing the slides.
Step 3: Use Lazy Susans and Turntables for Corner Access
Corner cabinets are notoriously difficult because items stored in back corners become completely inaccessible. A lazy susan solves this by making items rotate into reach.
A turntable works by placing items on a rotating platform. You spin it to bring whatever you need to the front. This is especially effective for small appliances, spices, or pantry items in jars.
Two styles exist: the basic turntable and the two-tier lazy susan, which adds a second rotating platform above the first, doubling your storage. For corner cabinets, a two-tier system maximizes awkward space that typically goes unused.
Measure your corner cabinet opening. Lazy susans come in diameters from 12 to 28 inches. Choose one that fits comfortably inside with a few inches of clearance on all sides.
Installation is simple: place the turntable on the cabinet floor and load items. No tools required. For added stability, use non-slip shelf liners under the turntable base.
Arrange items by frequency of use: most-used items toward the edge where they're easiest to grab. Backup supplies go toward the center.
Step 4: Implement Deep Pantry Organization Ideas
Pantry cabinets benefit from a categorized system combined with clear visibility and easy retrieval.
Categorize by Frequency of Use
The most effective pantry organization groups items by how often you use them. This ensures your most-reached items are always accessible and nothing gets buried.
Create three zones within your cabinet:
Daily-use zone (eye level, front half): Everyday cooking ingredients like oils, vinegars, and salt. These should be in the front-to-back accessible area.
Weekly-use zone (mid-level shelves, middle area): Baking supplies, specialty sauces, pasta, and rice. These can be slightly deeper but should still be visible.
Occasional-use zone (top or bottom shelves, back area): Holiday ingredients, specialty items, or things used monthly or less. These can go in harder-to-reach spots.
This system prevents buying duplicates because you couldn't find what you already had.
Use Clear Bins and Labeling Systems
Clear bins solve the visibility problem that makes deep pantries frustrating. You can see what's inside without opening each container.
Choose bins that fit your cabinet dimensions. Stackable bins work well for deep cabinets because they use vertical space. Clear plastic or glass containers let you see contents at a glance.
Use a label maker to mark each bin with its contents and the date opened. This prevents confusion and helps you rotate stock. For items in original packaging, consider transferring them to airtight containers. This saves space, keeps items fresher, and makes them easier to stack.
Step 5: Choose Kitchen Cabinet Storage Solutions That Fit Your Space
Beyond pull-out shelves and turntables, several other solutions address specific deep cabinet challenges.
Vertical Dividers and Risers
Vertical dividers prevent items from toppling and make it easy to see what you have. They're especially useful for storing baking sheets, cutting boards, and serving platters.
Install vertical dividers using adjustable shelf dividers (which mount to existing shelves) or freestanding dividers that stand on the cabinet floor. Adjustable dividers are more secure but require drilling. Freestanding dividers work for renters and require no installation.
Risers, small platforms that elevate items, add another layer of vertical organization. Stacking risers creates multiple levels within a single shelf, effectively doubling or tripling your storage capacity. For deep cabinets, risers in the back area let you stack items vertically instead of front-to-back, improving accessibility.
Combine risers and clear bins: use risers to create levels, then place clear bins on each level. This maximizes both vertical and front-to-back space while keeping everything visible.
Door-Mounted and Drawer Insert Options
Cabinet doors are often wasted space. Door-mounted organizers hold small items like spices or cooking utensils that would otherwise crowd your shelves.
Over-the-door racks work for lighter items. For heavier storage, ensure your cabinet door is sturdy enough to handle the weight. Older cabinets with thinner doors may sag over time.
Drawer inserts organize drawers into compartments, preventing the common "junk drawer" problem. For deep drawers, use tiered inserts that create multiple levels so you can see everything at once.
Step 6: Optimize for Accessibility and Mobility
Not everyone has the same reach or mobility. Organizing for accessibility means designing a system that works for aging parents, children, or anyone with limited range of motion.
Store frequently-used items between waist and eye level. This avoids excessive bending or reaching above shoulder height. For deep cabinets, pull-out shelves at mid-height are more accessible than fixed shelves requiring you to lean in.
Consider the person using the cabinet most often. If organizing for an elderly parent, prioritize pull-out solutions that eliminate reaching and bending. Lazy susans reduce the need to reach into corners. Vertical dividers make items easier to grasp.
For households with children, keep frequently-used items at their height too. This teaches them where things belong and makes it easier for them to help with cooking.
Non-permanent solutions are essential for accessibility because they can be adjusted as needs change. Retrofit pull-out shelves, freestanding risers, and removable dividers all adapt to changing circumstances.
Lighting matters more in deep cabinets. Consider adding battery-operated LED strip lights inside deep cabinets. These stick to the underside of shelves and illuminate the area below, making it much easier to find items.
Step 7: Make It Permanent or Rental-Friendly
The solutions you choose should match your living situation. Homeowners can invest in permanent installations, while renters need removable systems that leave no damage.
For homeowners, permanent pull-out shelves installed with proper brackets are durable and reliable. Full-replacement shelves offer the most seamless look.
For renters, retrofit pull-out shelves are ideal because they mount to the inside of cabinet walls without drilling into visible surfaces. Lazy susans, risers, and clear bins require no installation at all and are completely portable.
A hybrid approach works well: use permanent solutions for structural organization in cabinets you'll keep long-term, and removable solutions for flexibility.
Document your system before leaving a rental. Take photos of how you organized each cabinet. This helps you recreate the system in your next home and provides evidence that you left the space in good condition.
The best organizational systems are the ones you maintain. Choose solutions that are easy to use and easy to restore when items get disorganized.
| Solution | Best For | Installation | Permanent | Cost Range |
|---|---|---|---|---|
| Pull-out shelves | Deep rectangular cabinets | 20-30 min per shelf | Removable retrofit | $60-150 per shelf |
| Lazy susan | Corner cabinets | No installation | No | $25-80 |
| Vertical dividers | Baking sheets, cutting boards | 5-10 min | Removable | $15-40 |
| Clear bins | Pantry organization | No installation | No | $20-60 per set |
| Risers | Vertical space maximization | No installation | No | $15-50 per set |
| LED strip lights | Visibility in deep cabinets | 5 min adhesive | Removable | $10-25 |
| Door-mounted racks | Small items, spices | 10-15 min | Removable | $20-50 |
Organizing deep kitchen cabinets for easy access transforms how you use your kitchen. The challenge most people face isn't lack of space, it's lack of visibility and accessibility. ShopVerse.life offers curated storage solutions designed specifically for this problem, including pull-out shelf systems, clear organizational bins, and vertical storage tools that make deep cabinets functional. With the right combination of solutions, you'll spend less time searching for items and more time cooking. Start with your most-used cabinet and apply one solution this week, you'll immediately notice the difference in daily convenience.
Frequently Asked Questions
What's the best way to organize deep kitchen cabinets?
Start by assessing your cabinet depth and dead space, then layer solutions: pull-out shelves bring items to the front, lazy Susans maximize corner access, and clear bins with labels keep everything visible. Categorize items by frequency of use, daily items toward the front, occasional items in back. Vertical dividers and risers add storage levels. Test solutions before committing to permanent installation, especially in rental homes.
How do pull-out shelves for deep cabinets improve accessibility?
Pull-out shelves extend fully or partially, eliminating the need to reach deep into dark cabinet space. They reduce strain on your shoulders and back by bringing items to eye level and arm's reach. This is especially valuable for aging adults or those with limited mobility. Most pull-out shelves are adjustable and can support weight up to 50 pounds, making them ideal for pots, pans, and small appliances that would otherwise sit unreachable in the back.
Can I use a lazy susan for cabinets in a rental apartment?
Yes, lazy Susans and turntables are non-permanent solutions perfect for renters. They require no installation, just placement on a shelf or cabinet base. They work best for oils, spices, condiments, and small containers. Opt for stackable turntables to maximize vertical space. Since they're portable, you can take them with you when you move, making them a cost-effective way to organize deep pantry shelves without damaging walls or cabinets.
What should I store in the back of a deep cabinet?
Reserve the back for items used infrequently: seasonal serving dishes, backup small appliances, specialty baking tools, or bulk pantry items in stackable containers. Keep these items in labeled, clear bins so you know what's there without pulling everything out. Avoid storing fragile or frequently needed items in the back, place those in the front-to-back arrangement where they're easily reachable. Rotate inventory periodically to prevent forgotten items from expiring.
This article was written using GrandRanker